Tag: cooking with kids

A Gift for You – The Week Before Christmas Packet

Christmas is just around the corner.

It’s a joyous holiday celebrated around the world by both Christians and non-Christians. It’s a time to celebrate family, friendships and for Christians, Christ. It’s filled with parties, gift-giving, food, and fun. BUT it can be exhausting!

If you’re like me, you’ve had Christmases that when all was said and done, felt disappointing. Oh, the gifts were good, and you got everything on your to-do list done but something was missing. After a few decades of thinking about that after-Christmas feeling, I know what it is for me. I didn’t spend enough downtime with my family, I failed to connect heart to heart and laugh to laugh. I was just too busy.

When I pinned this down for myself, I thought, “I bet I’m not the only person out there who feels 
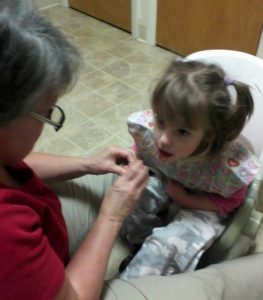
this way.” So, I compiled a packet of simple, inexpensive and family-centered activities to help myself and others spend some quality time together at Christmas. I combed the Internet and gathered information and links so you wouldn’t have to. You can print the PDF HERE.

Wouldn’t it be wonderful to spend five, six or even seven quiet evenings with just you and your family celebrating this remarkably joyous season? I’m with you, it would. We can make that happen by cleaning out our calendar and making a commitment to do it.

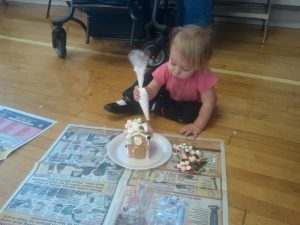
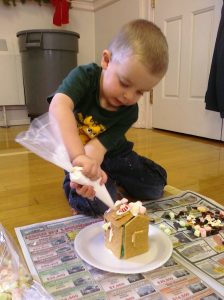
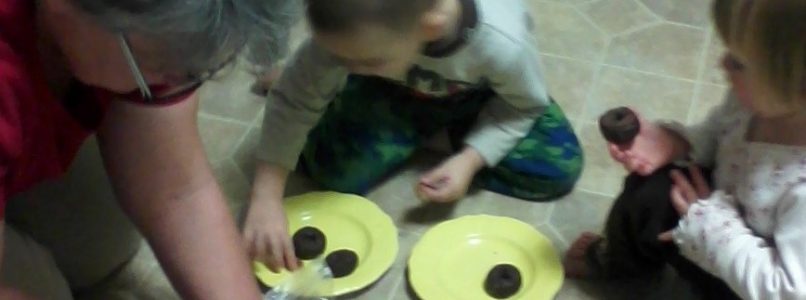
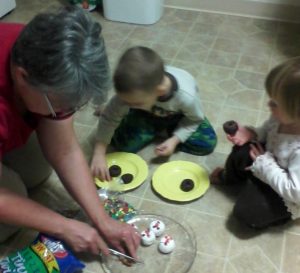
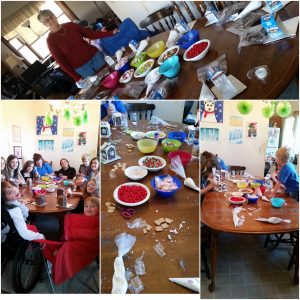
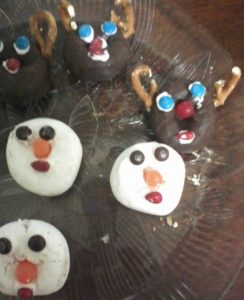
When I first put this together I tried it out. I had a few of my grands over and we did two of the activities. We made donut snowmen and donut reindeer. We learned that frosting and candies do not stick on powdered donuts very easily! We learned that if you don’t keep an eye on them, the noses will disappear from the snowmen’s faces. (Jack was that you?)

We learned that working on the floor is perfect, as the mess is right where you can sit in it easily! We learned that cutting pretzels for antlers is not as easy as it looks and if you don’t do it right you have ears. Reindeer look very funny with ear-shaped antlers. We learned that we love working together and that the whole project only took about 20 minutes. Then we ate!

Here’s to spending time as a family, calming the craziness, celebrating together and gearing up for a fabulous 2020. You can print the PDF HERE.

With holiday wishes for joy,
Mary Ann Johnson

Why not share this with someone

you care about. : ) 

My Second Christmas Gift to You

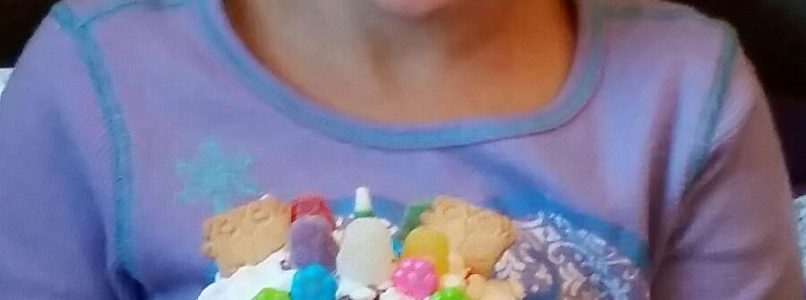
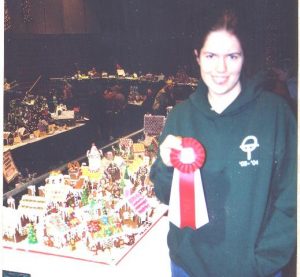
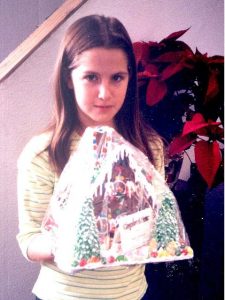
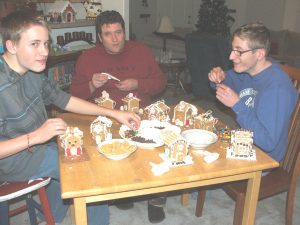
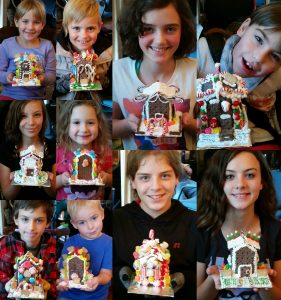
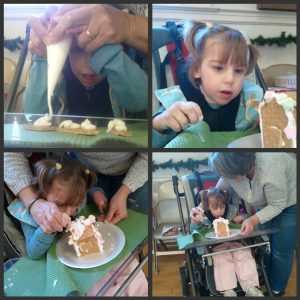
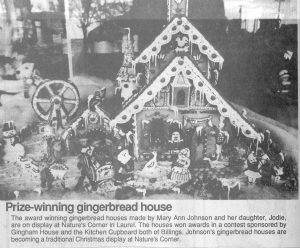
In my time I have made some award-winning gingerbread homes. I’ve made whole villages. I’ve made Ferris wheels and merry-go-rounds that actually move. I LOVE making gingerbread creations.
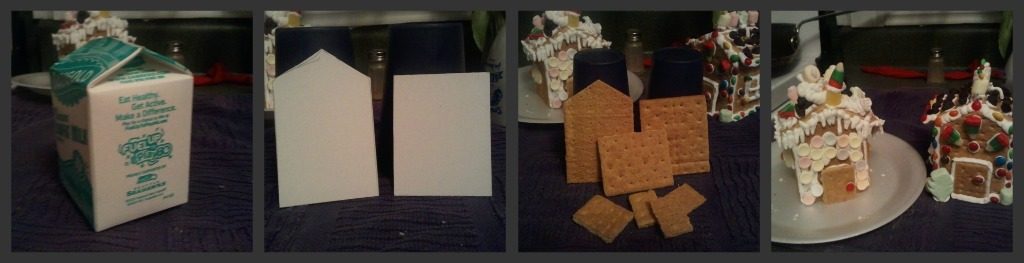
But even more than making fancy gingerbread creations, I LOVE helping kids make their own. In our family, we have a gingerbread tradition. Each year I help my grandkids make houses. Then I go to their school and help their friends make them. Most years I help over 100 children make a gingerbread house.

This is a project that any family can do. When you add popcorn, hot cocoa, a good Christmas story and lots of hugs at the end of the project you have a perfect family activity. This is my gift to you – An afternoon or evening of holiday family fun.

What you need are a few disposable bags and the right frosting recipe! Trust me; the recipe makes all the difference.

How to help kids make Gingerbread Houses:

Take it step by step
  • Call your local school and get some empty milk cartons
  • Buy graham crackers and lots of small candies, raisins, and mini-marshmallows
  • Snip off the top of the carton (where it is sealed) and tape it shut. Now it looks like a house
  • Lay carton on its side on a sheet of paper or cardboard and trace; cut out pattern
  • Lay carton on its front on a sheet of paper or cardboard and trace; cut out pattern
  • Lay the pattern on a graham cracker and using a serrated knife (plain will not do!) cut 2 sides, a front, and back. Usually, the cracker is just a bit narrower than the pattern. It won’t matter. (If you need to trim a cracker use scissors)
  • Half a cracker should make a fine roof. If the overhang is too large just trim to the size you want.
  • Cut a door and three windows from the scraps
  • Make the frosting and put into disposable decorating bags or the corner part of a sturdy Ziploc. Cut off the tip of disposable decorating bag or corner of Ziploc bag. Don’t make the opening overly large.
  • If using a disposable decorating bag rubber band the back end shut so the frosting stays inside
  • Using frosting, glue carton to a Styrofoam plate or square of cardboard covered with foil.
  • Using the frosting glue the sides, front and back to the carton. Add roof pieces. Use plenty of frosting. Jiggle the cracker up and down on the carton to stick it well. Don’t press on the cracker or you may break it.
  • Put the door and windows in place.
  • Cover the seams one at a time with the frosting and add candy. Royal frosting dries quickly so do only a small section at a time so that it doesn’t crust over making candy adhere poorly.
  • Finish decorating the house any way you want

Tips to help parents have fun while their make their houses:

  • Mentally prepare for a messy table, floor, fingers and shirt fronts.
  • Kids will suck on the decorating bag. Get over it!
  • Some kids will put NO candy on their house; it will all go inside them. Just accept it. : )
  • Some children will put the door or windows on the roof. It’s OK.
  • Not all children will cover all of the seams. They don’t see the carton and a successful house to them isn’t dependent on all the seams being covered. Let it go!
  • Many children will put no candy anywhere but the roof. It is the part they see and the rest doesn’t matter to them.
  • Children under 2 need help. Squeezing the bag can be too hard. Putting the candy on the frosting is enough for them.
  • Children between 2 and 3 want to squeeze the bag even if it is hard. Holding their little hands in yours helps them just enough.
  • Children over 3-4 can usually manage this project with only a few instructions. When I work with large groups of children or even just my grandkids, we work at the same pace, one piece at a time, until the house is assembled. Then I turn them loose.
  • Children over 5-6 need very little help and if they are over 8-9 will resent any help. : )
  • I have been helping children make gingerbread houses for over 40 years and in all that time I have never seen a child who didn’t like their finished house no matter what it looked like, even the house with NO candy on it, unless an adult pointed out the flaws. Resist the temptation to ‘do it your way.” Don’t spoil it!!
  • If you fix their house so that all the seams are covered or so it looks “good” it’s no longer their house. It’s yours. Don’t be selfish.

I hope you have a wonderful time making a village for your home and just plain enjoying one another’s company. Happy Holidays!

Merry Christmas,
Mary Ann

Frosting for Gingerbread Houses:

Royal Frosting (Meringue Powder)

This frosting is much easier to make and handle. Grease does not break it down and it can be re-beaten for later use. It can be stored in covered container for up to 6 months. Meringue powder can be purchased at some craft stores and any store that sells cake decorating supplies. Worth the extra cost!

¼ cup meringue powder ½ cup water
4 cups or 1 pound powdered sugar

Mix the meringue powder and water…beat until it peaks. Add the sugar (1/2 cup more for stiffer frosting) ½ cup at a time on low and then beat on high to desired consistency. This will beat up a bit more quickly than the egg white version.

Royal frosting dries quickly and as hard as cement so keep it covered at all times with a damp cloth or in a tightly covered bowl until you put it into the bags. As you use it on the houses encourage and remind kids to do small sections at a time because if it “crusts up” things don’t stick as well.

The BRAG Corner

A 2-year-old who is doing it herself.


The rubber band keeps the frosting ‘in’ the bag.


Award winning village made by a youth group.


My oldest, for a school project. The periscope really went up and down.
My youngest and her ‘first’ real gingerbread house.


Even a family of boys likes making houses.


This is a project that kids LOVE!